Kubernetes Checkpoint Restore Operator Checkpointing
Creating a Checkpoint/Restore Operator in Kubernetes to transparent checkpoint and recover stateful Deployment Pods.
Kubernetes Checkpoint Restore Operator
Every application handles data in memory at some point. There are usually two types of applications: stateless and stateful.
The stateless applications do not depend on the application’s memory to execute its functionality, it depends on persistent storage of its data. Let’s take as an example an REST server, it, usually, does not handle every data in memory, it depends on persistent storage, like a database or a file storage, to handle the requests. When a request comes from a user it will request the data from the database, apply some transformations and send the data to the user, it does not need any memory state like a user session.
While the stateless applications do not depend on their state for the execution, the stateful applications depend on their state to provide its functions. Let’s take as an example a streaming video platform, every user is connected to the platform and receives bytes of the data on the streaming, the next chunk of data to be sent depends on the data that is stored in the memory execution.
Another property of stateful applications is that when the application restarts it will not have the previous execution information, the stateless application could just load the state from a persistent storage. So, stateless applications running on containers, like a Kubernetes pod, when restarting do not have any requirements to restore the state, it is part of the application to load the state from the persistent storage. Also, these applications can use something like a Statefulset to persist the state inside the cluster.
Stateful applications, however, require their previous execution state to function correctly after a restart. Standard Kubernetes mechanisms don’t inherently preserve this in-memory state across container restarts, so it is not possible to recover from a fail while preserving the state in a stateful application in Kubernetes.
Checkpointing
CRIU (Checkpoint/Restore in Userspace) is used in the Linux Kernel to provide utilities on checkpointing and restoring a process. It is a kernel feature that allows to save the state of a process to a file, and restore the state from a file. Recently, Kubernetes added the ContainerCheckpoint feature gate which uses CRIU to checkpoint a container process, but it does not provide the restoring part. Trying to solve this problem in Kubernetes, I am creating a Checkpoint Restore Operator. The operator will be responsible for checkpointing monitored pods and restoring them from the latest state checkpoint, providing high availability for theses containers. When such an application fails, restoring its in-memory state might involve complex logic like replaying events or loading snapshots from persistent storage. With this operator, you could potentially rely on checkpoints to restore the application’s exact state more directly.
One of the requirements of this application is transparency, so the user should not be required to change its deployments in order to add the checkpointing feature. We are going to work with annotations and leverage the work to custom resource definitions and controllers to implement the checkpointing and restoring features.
It’s important to notice that CRIU do not checkpoint some of the application state. File locks in the process, some types of sockets and open files in unmounted filesystems are types of resources CRIU cannot dump, more of these cases can be found here. We are not going to worry about these special cases as these implications will worry a small percentage of the applications we can actually checkpoint.
This blog post will describe the checkpointing of containers in the operator. The operator monitors Deployments for a specific annotation (kcr.io/checkpoint-restore-schedule) containing a cron schedule. The operator will then schedule this checkpoint to be requested given the schedule. By communicating with the Kubelet API we can checkpoint the container and Kubelet will save the checkpoint in the Node storage. Later, we are going to use this checkpoint file to create a container image that we can use to restore the application later. It is important to note that this version of the operator will not handle deployments with more than one replica and the scalability of the operator. Furthermore, to focus on the core checkpointing and image creation workflow, the implementation described here assumes a single-node Kubernetes cluster environment. Challenges specific to multi-node clusters, such as accessing checkpoint files across nodes and distributing checkpoint images via a registry, will be addressed in future posts.
To make the checkpoint work we must declare all the custom resource definitions we are going to create and the controllers that will reconcile theses resources so we can checkpoint the containers. We are going to start by the custom resource definitions:
- CheckpointSchedule: This is the schedule given in the Deployment annotation, we are going to use it to schedule each checkpoint.
- CheckpointRequest: When the scheduled time comes from a checkpoint schedule we will request a checkpoint for the Pod container, this information is stored here.
- Checkpoint: After the request for the Checkpoint succeeds we are going to have a Checkpoint stored into a Node storage.
These custom resource definitions will be handled by controllers in order to reach the desired state. So we are going to have the following controllers:
- Deployment Controller: Monitors deployments to check if any deployment has the annotation to monitor. When a Deployment has the annotation we are going to create a CheckpointSchedule or update an existing one.
- CheckpointSchedule: This controller will schedule a cronjob or update an existing one to accomodate the checkpoint schedule. It’s goal is to whenever the scheduled time comes to request a checkpoint. We decoupled the schedule of the checkpoint from the request of the checkpoint so every one of our features could work well at one thing. This separation of concerns decreases complexity, improves readability and maintainability, and simplifies testing.
- CheckpointRequest: This controller requests the checkpoint to the Kubelet API and creates the Checkpoint associated with it.
- Checkpoint: This controller will convert the checkpoint file generated by the Kubelet API into a container image using building tools, like buildah.
Let’s get into more detail about each step of the checkpointing.
Monitoring deployments
The first step into checkpointing is to detect the deployments that want to have the checkpoint and restore added to it. This will be accomplished by an annotation into the deployment, kcr.io/checkpoint-restore-schedule, this annotation will provide a cron like schedule to checkpoint deployment Pod. We are going to use this annotation to monitor the deployments like the flow diagram below:
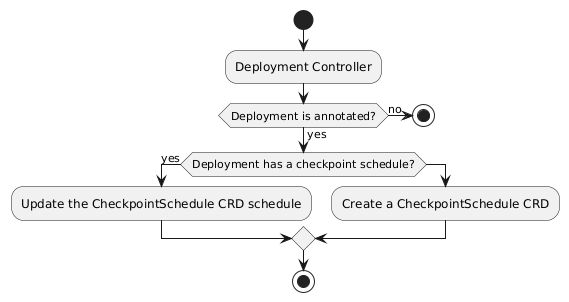
This will ensure that for every annotated Deployment, a Deployment that should be monitored for checkpoints, a CheckpointSchedule is created to checkpoint the Deployment at the given schedule.
Scheduling checkpoints
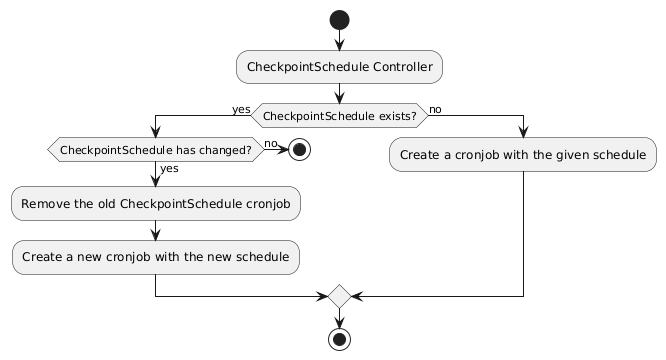
After creating the CheckpointSchedule, we must actually schedule the checkpoint requests. This is done by the CheckpointSchedule controller, this controller will reconcile the CheckpointSchedule resource. When a resource is created we must add a new cronjob with the given schedule so we can request a checkpoint whenever the schedule is reached. This implies that when a CheckpointSchedule schedule changes we must remove the old cronjob and create a new one following the new schedule. The process inside the cronjob is pretty straightforward, we create a new CheckpointRequest whenever the schedule is reached. The CheckpointSchedule will handle just the scheduling of the checkpoints, while the CheckpointRequest will actually request a checkpoint. The flow diagram below illustrates the process in the CheckpointSchedule controller:
There is an implication on making a checkpointing on a schedule. Whenever the checkpoint happens new requests or old ones in progress are freeze. This means we generate an unavailability to the service until the checkpointing completes. So, using a shorter schedule would generate low availability to the service, which is kind of the opposite we are trying to accomplish. There are some drawbacks on using a schedule, but using other checkpoints triggers is out of the scope of the post, we can cover it in later posts.
As the cronjob execution is too small, we just create a CheckpointRequest CRD, we are not going to provide a diagram for that.
Requesting checkpoints
When the cronjob creates a CheckpointRequest, the CheckpointRequest controller reconciles the resource by checking if the request was already made or not. When the request is not made yet we start the request and change the status of the CheckpointRequest to Requested. When the request succeeds we change the status to Succeeded and when it fails we change the status to Failed. The request can fail because we are communicating with the Kubelet API to generate the checkpoint, as the communication between services is not a reliable mechanism, we cannot guarantee that the Kubelet will be available at the time of the checkpoint. The flow diagram below illustrates the process in the CheckpointRequest controller:

In order to create a checkpoint we must call the Kubelet API at /checkpoint/{namespace}/{pod}/{container}. We cannot call the Kubelet API of each Node directly, we would have to mount the authentication for every one of the Kubelet replicas. Instead we are going to call the Kubernetes API to communicate with the Node Kubelet. Before we call the Kubernetes API, the Service Account associated to the operator must have the permissions for get, create and post at nodes/proxy resources, this will ensure we can proxy requests to the API.
Kubernetes will mount the Service Account to the Operator, so we can communicate with the Kubernetes API using the authentication from this Service Account. By calling https://<master-node-ip>/api/v1/nodes/{nodeName}/proxy we can issue any request to a node in the cluster, the request will be validated at Kubernetes API server and authenticated using RBAC, as the API server has the required credentials to communicate with any Node, we don’t need to worry about the required certificates to communicate with a Node’s Kubelet.
Security Note: It’s crucial to understand that granting broad permissions for
nodes/proxy(likeget,create,poston all nodes) is a significant security consideration. This permission allows the operator to proxy requests to any endpoint on any node, including potentially sensitive Kubelet APIs beyond just checkpointing. While usingnodes/proxysimplifies authentication for this technical demonstration compared to managing Kubelet certificates directly (which presents its own security challenges), it requires careful RBAC management in a production environment. For the purpose of this post, which focuses on the technical workflow of checkpointing, we utilize this mechanism, but securing this access pattern for production deployments is a critical step that would require more granular RBAC or alternative secure communication methods.
Summarizing, to request a checkpoint for a Pod we must:
- Add to the Operator service account permissions for
get,createandpostatnodes/proxy. - Discover the name of the Node where the Pod is running.
- Call the Kubernetes API server at
https://<master-node-ip>/api/v1/nodes/{nodeName/proxy/checkpoint/{namespace}/{pod}/{container}, this should generate a checkpoint file in the Node’s storage.
Generating images from checkpoints
When the Kubelet API generates a checkpoint it creates a compressed file with the state of the process into files. Although the raw checkpoint files might be usable by some container runtimes, we are going to package the checkpoint into a standard OCI container image. THis makes the state portable and allows the restore process to leverage standard container workflows. In order to do so, we must detect the creation of the Checkpoint CRD and generate the image. The diagram flow for the Checkpoint controller is pretty simple:

To generate the image from the checkpoint we could use a container runtime, but we want to implement the required features inside a container and we do not want to install many dependencies neither run a daemon tool. So, we will use buildah, which is a daemonless container building tool for OCI container images. This will enable us to use buildah in our application as a package to build the image. Crucially, within our current single-node scope, we assume the controller building the image has access to the checkpoint location on the node where Kubelet saved the file (e.g., via hostPath mounts or running on the same node). Solving this access challenge robustly for multi-node clusters is deferred.
The tutorial about checkpointing shows how to use buildah to build the container image from the command line. Here we show the code to build the image using Go:
package imagebuilder

import (
	"context"

	"github.com/containers/buildah"
	is "github.com/containers/image/v5/storage"
	"github.com/containers/storage"
	"sigs.k8s.io/controller-runtime/pkg/log"
)

type BuildahImageBuilder struct {
	buildStore storage.Store
}

func NewBuildahImageBuilder() (ImageBuilder, error) {
	buildStorageOptions, err := storage.DefaultStoreOptions()
	if err != nil {
		return nil, err
	}
	buildStore, err := storage.GetStore(buildStorageOptions)
	if err != nil {
		return nil, err
	}
	return BuildahImageBuilder{
		buildStore: buildStore,
	}, nil
}

func (b BuildahImageBuilder) BuildFromCheckpoint(checkpointLocation string, imageName string, ctx context.Context) error {
	log := log.FromContext(ctx)

	builderOptions := buildah.BuilderOptions{
		FromImage: "scratch",
	}

	builder, err := buildah.NewBuilder(ctx, b.buildStore, builderOptions)
	if err != nil {
		return err
	}
	log.Info("Successfully retrieved a builder")

	err = builder.Add(checkpointLocation, true, buildah.AddAndCopyOptions{}, ".")
	if err != nil {
		return err
	}
	log.Info("Successfully added the checkpoint file to the builder")

	imageRef, err := is.Transport.ParseStoreReference(b.buildStore, imageName)
	if err != nil {
		return err
	}
	log.Info("Successfully created the image reference")

	_, _, _, err = builder.Commit(ctx, imageRef, buildah.CommitOptions{})
	log.Info("Successfully created the image")
	return err
}
We have made an interface ImageBuilder with a method BuildFromCheckpoint so we can mock the buildah dependency while testing and test other solutions when needed. The code for this image builder initializes the storage using the default store options, this store is where buildah will store image contents. We are going to use the buildStore to create a new image and add the checkpoint file to it. We are going to use the is.Transport.ParseStoreReference to create a new image reference and then we are going to commit the image to the store. The process is very similar to the one we have seem at the tutorial, it follows the same order trought code, first it initializes the builder, adds the checkpoint file that container runtimes, like cri-o, will identify as a checkpoint, create the image reference and later commit the image to the store. There is only one step missing here that is the distribution of the image that we will cover in another post, this will ensure every Node in Kubernetes has the same image so we can use at the container recover flow.
Conclusion
By splitting each functionality of the operator into smaller custom resource definitions we created simpler diagrams and simple codes. Every controller in this operator is responsible for a single part of the whole checkpointing process and it can resolve this problem well within the defined scope. This blog post details the solution to create a Checkpoint in Kubernetes using the ContainerCheckpoint feature gate and some toolings, specifically focusing on a single-node cluster scenario. We didn’t cover the restoring part, nor the complexities required for robust multi-node operation, as these will be covered in other posts.